Website Domains
This section shows you how to configure your JoyBird website.
In particular, we'll cover:
understanding where your site will be publicly available by default
adding your own domain or subdomain to your JoyBird site
Choosing the URL for your JoyBird website
Default Site URL
When a new website is created on JoyBird, by default we automatically create a preview subdomain for you.
This usually looks something like green-apple-unicorn.joybird.ai.
This allows you to make any changes you like, such as adding and updating pages on your site and then preview it immediately at this subdomain.
Note that this subdomain is publicly available, meaning anybody with this address will be able to view your site.
If you have no preference on your site's domain, this default URL may be enough for you and you can ignore the rest of this section.
Changing The Default Subdomain
We assign subdomains based on a random jumble of words.
If you were assigned something you didn't like (maybe ten-rotten-eggs.joybird.ai??) you have the option of requesting any available subdomain (perhaps sunshine-and-rainbows.joybird.ai).
To do so, please contact us via email.
Adding Your Own Subdomain or Domain
Let's say you already have an existing website at mysite.com. This could either be hosted with JoyBird or anywhere else.
You can choose to host a subdomain with JoyBird, by pointing blog.mysite.com to your JoyBird website. You may even choose to point your domain itself (mysite.com) to your JoyBird website.
We'll explain how to do both of this in detail in the next section on this page.
Setting a Custom URL for your JoyBird website
The following sections only apply if you wish to host your JoyBird site at either your subdomain (like blog.mydomain.com) or at your domain (like mydomain.com). You do not need to read this section if you would like to continue hosting your site at a *.joybird.ai subdomain (this is the default behavior).
To use a subdomain or a domain, you will need to take 2 steps:
In your JoyBird admin dashboard, update your Site Settings to tell us what subdomain or domain you want to use.
On your DNS server (usually with the same company you originally registered your domain at), you will need to add some DNS records.
We'll cover each of these below.
Updating your Site Settings
You can set your custom subdomain or domain from the JoyBird admin dashboard, then navigating to Settings > Site Settings and clicking on the "Use Your Own Domain" button.
This will open a form for you to enter your requested subdomain or domain. You can also request that JoyBird register a domain on your behalf, which comes with a registration fee.
Updating your domain records
Your domain will have a set of "DNS records", which are basically an address book of where you would like various parts of your domain to be hosted.
For example, you might have a main site at mydomain.com, a separate blog at blog.mydomain.com, as well as other configurations for sending and receiving emails.
In order to view your JoyBird website at your subdomain or domain, you will need to create additional DNS records. This is usually done with the company you originally registered your domain, not with JoyBird.
These will be what are called "CNAME" records, which let all visitors to your domain know which servers to look at to find your website.
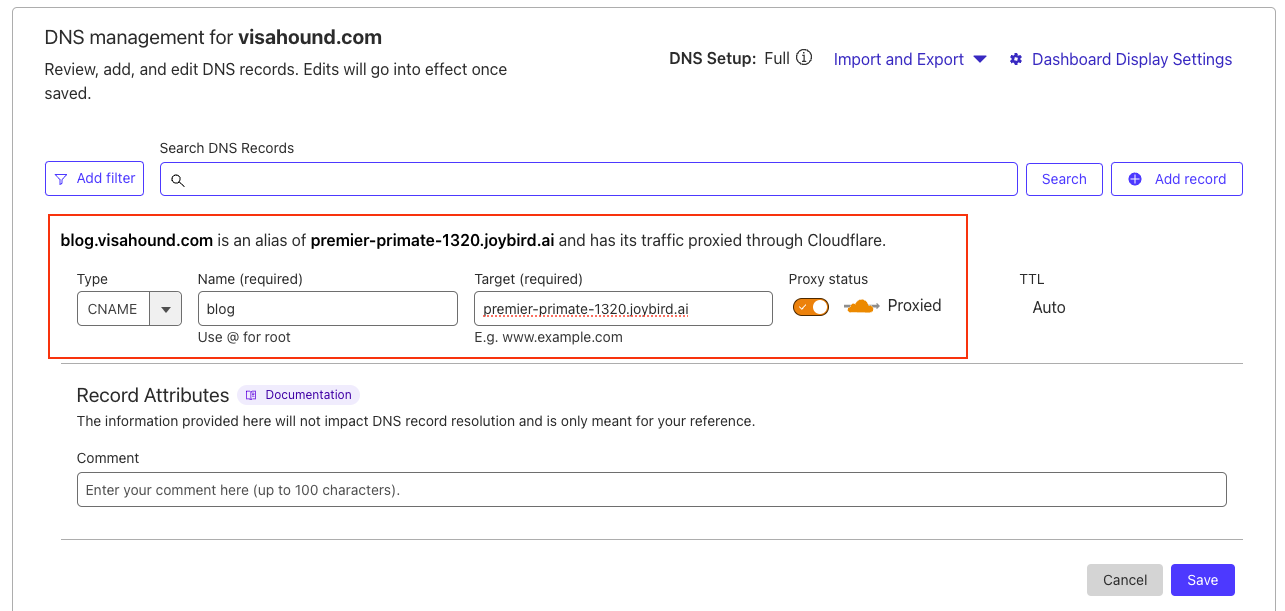
Depending on where you registered your domain, the admin dashboard may look slightly different. Here is an example from CloudFlare, showing how to create a CNAME record for a blog subdomain to point to a JoyBird website.

To use your domain (eg mydomain.com) with your JoyBird site, the steps are the same except the Name field would use "@" instead of "blog" for the subdomain.
Note: Not all domains will be able to do this. Redirecting your main domain to JoyBird requires your DNS servers to support CNAME records at the Apex Domain or CNAME Flattening.
If your DNS server does not support CNAME Flattening, your options with JoyBird are:
Use a subdomain with JoyBird instead, such as blog.mysite.com
Consider switching DNS servers to a provider which does support this feature
Some DNS providers which support CNAME Flattening (or equivalent) include: